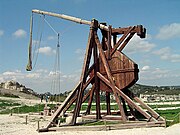
What is a Trebuchet?
A trebuchet is a medieval siege weapon. Here are a few examples:
 Château des Baux |
 Runneburg |
 Warwick Castle |
 Château de Castelnaud |
Its primary use was to hurl rocks at castle walls. Think of it as a catapult on steroids. The major difference is a trebuchet uses a rotating arm, a large weight, and whip-like action to throw the projectile. Here's a YouTube video of a trebuchet in action:

Trebuchet Video
Why Build a Trebuchet?
Many say it's an interesting demonstration of applied physic. Some like the connection to ancient technology, and weaponry. But let's face it, there are very few castle walls to knock down anymore. Any reason other than "it's cool" is a rationalization.Model Design
I choose to build a 1/6th scale model based on Dan Becker's design . I enhanced it by adding an adjustable release hook, and trigger.Construction
The main frame is built out of four strips of pine, each 12" long. Two pieces are mortised together, forming a right angle.
 Mortise Cut |
 Frame pieces |
Cross beams are added, and secured in place with wood screws:
 Frame With Cross Beams |
 Secured Cross Beams |
Finally, the two frame halves are connected with four three-inch beams.
 Frame With Connecting Beams |
The throwing arm is built from a 19" piece of hard wood that is tapered at one end with a router:
 Tapering Arm |
Knotches are cut on each end of the throwing arm. One to hold the counter weight, and one to hold the throwing hook:
 Arm (Counter Weight End) |
 Arm (Hook End) |
Trebuchets thow in a similar manor to a hand-held sling. The projectile is held in a pouch (sling) attached by two lines. During the throw, one line remains attached; the other releases. The timing of the release is controlled by a hook at the end of the throwing arm. When the sling whips around, the line slips off of the hook and releases the projectile. The release point can be changed by altering the angle of the hook.
 Hook |
 Hook and Throwing Arm |
 Hook and Sling |
The counter balance weight is a 2.5lb fishing weight tied to a eye screw:
 Counter Balance Weight |
The sled is used to guide the projectile in the early part of its flight:
 Sled |
The trigger is used to hold the arm in place until the trebuchet is ready to fire. It's constructed from half a key ring with two loops soldered in stratigic locations:
 Trigger |
 Trigger (Attached) |
 Trigger (Ready to Fire) |
Finished Trebuchet
After some stain, varnish, and paint, here's the finished trebuchet:
Conclusions
The trebuchet doesn't throw as far as I'd hoped, but it's a toy not a weapon. And it was fun to build.Here's a quick video of a second version of the trebuchet in action:

Trebuchet Video (280K)


